3D Mesh Tools
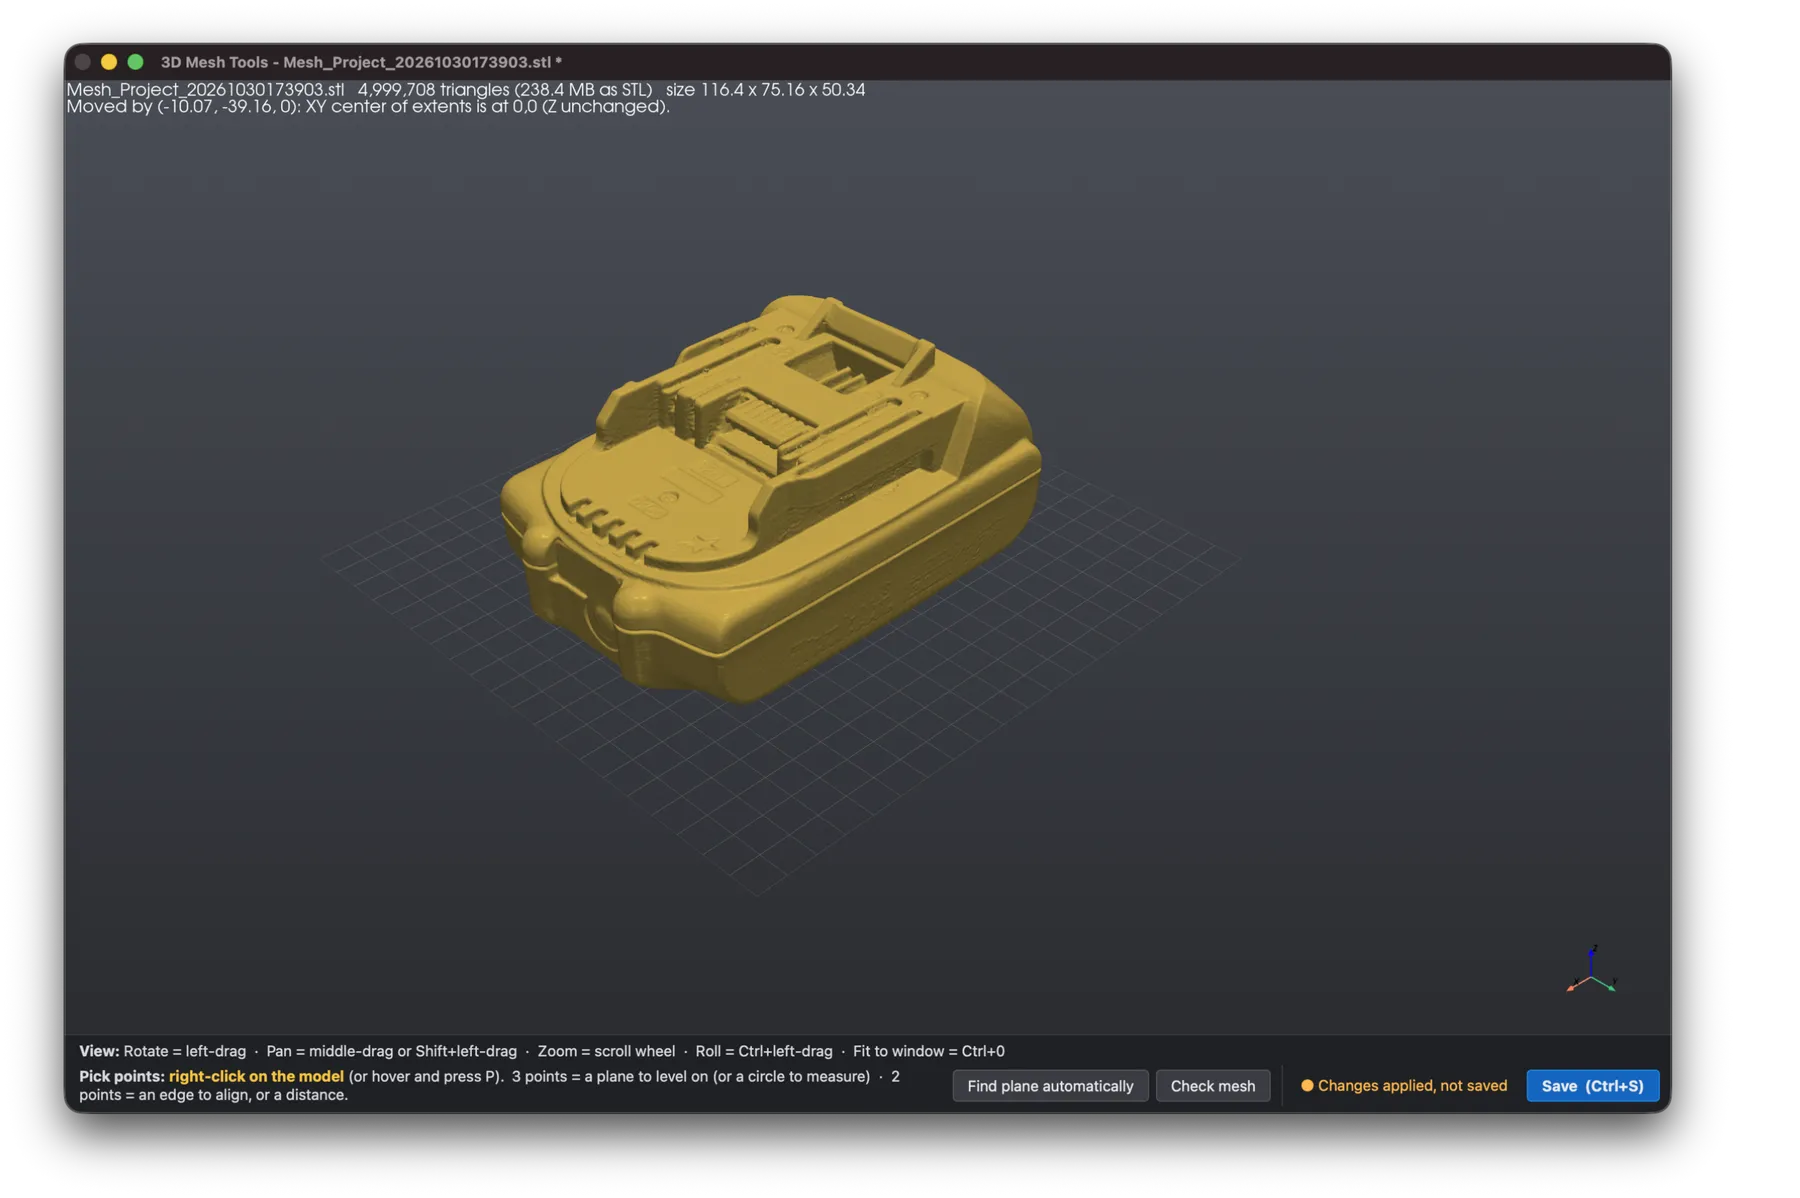
3D Mesh Tools is a free desktop tool for tidying up STL meshes — especially 3D scans, which rarely come out of the scanner clean, watertight or sitting square to anything. Check the mesh for problems, remove scanner debris and fill small holes, then pick a few points on the model (or let it find a flat face for you) to level the part, make a rough scanned face perfectly flat, square it to the X/Y axes, scale it to a known dimension, put the origin where you want it and cut a huge scan down to a manageable file size. A colour map shows exactly how far the surface has moved from the original scan. Then save a clean STL that drops straight into CAD, a slicer or a reverse-engineering workflow.
It comes with 3D Mesh Compare, which lines a scan up with its CAD model (exported as STL) or another mesh and colours every point by how far it is off — with a tolerance band, statistics, point callouts and an HTML report you can send to a client. Read about 3D Mesh Compare.
Download (zip) · Install guide · 3D Mesh Compare →
Current version: 2.2.0 · Windows, macOS and Linux · requires Python 3.10 or newer
What it does
Check and repair
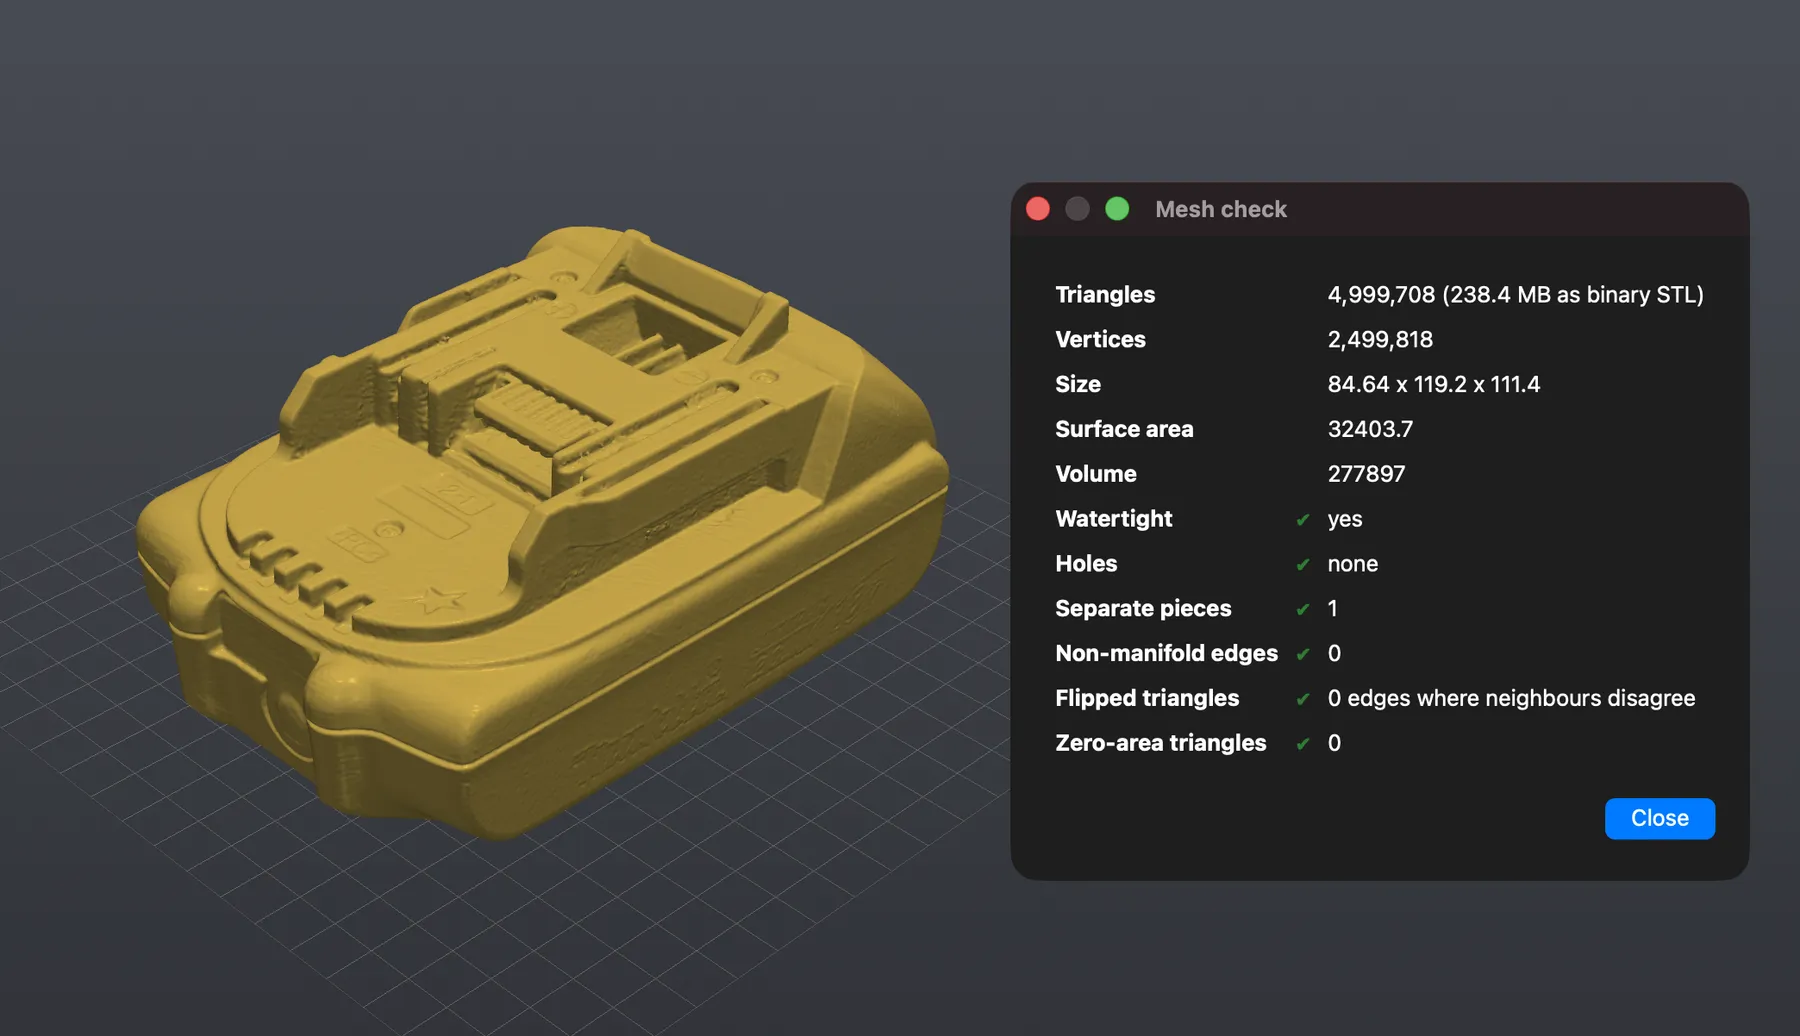
- Check the mesh. One click reports whether the mesh is watertight, how many holes and separate pieces it has, and whether there are non-manifold edges, flipped or zero-area triangles. Problems are labelled on the model — even holes a fraction of a millimetre across.
- Remove scanner debris. Delete small loose pieces below a size you choose, or keep only the largest piece. The pieces that will go are shown in red before anything changes.
- Fill small holes. Close holes up to a size you choose, so the mesh is watertight for printing. Each hole is labelled as fill or open while you decide.
Align
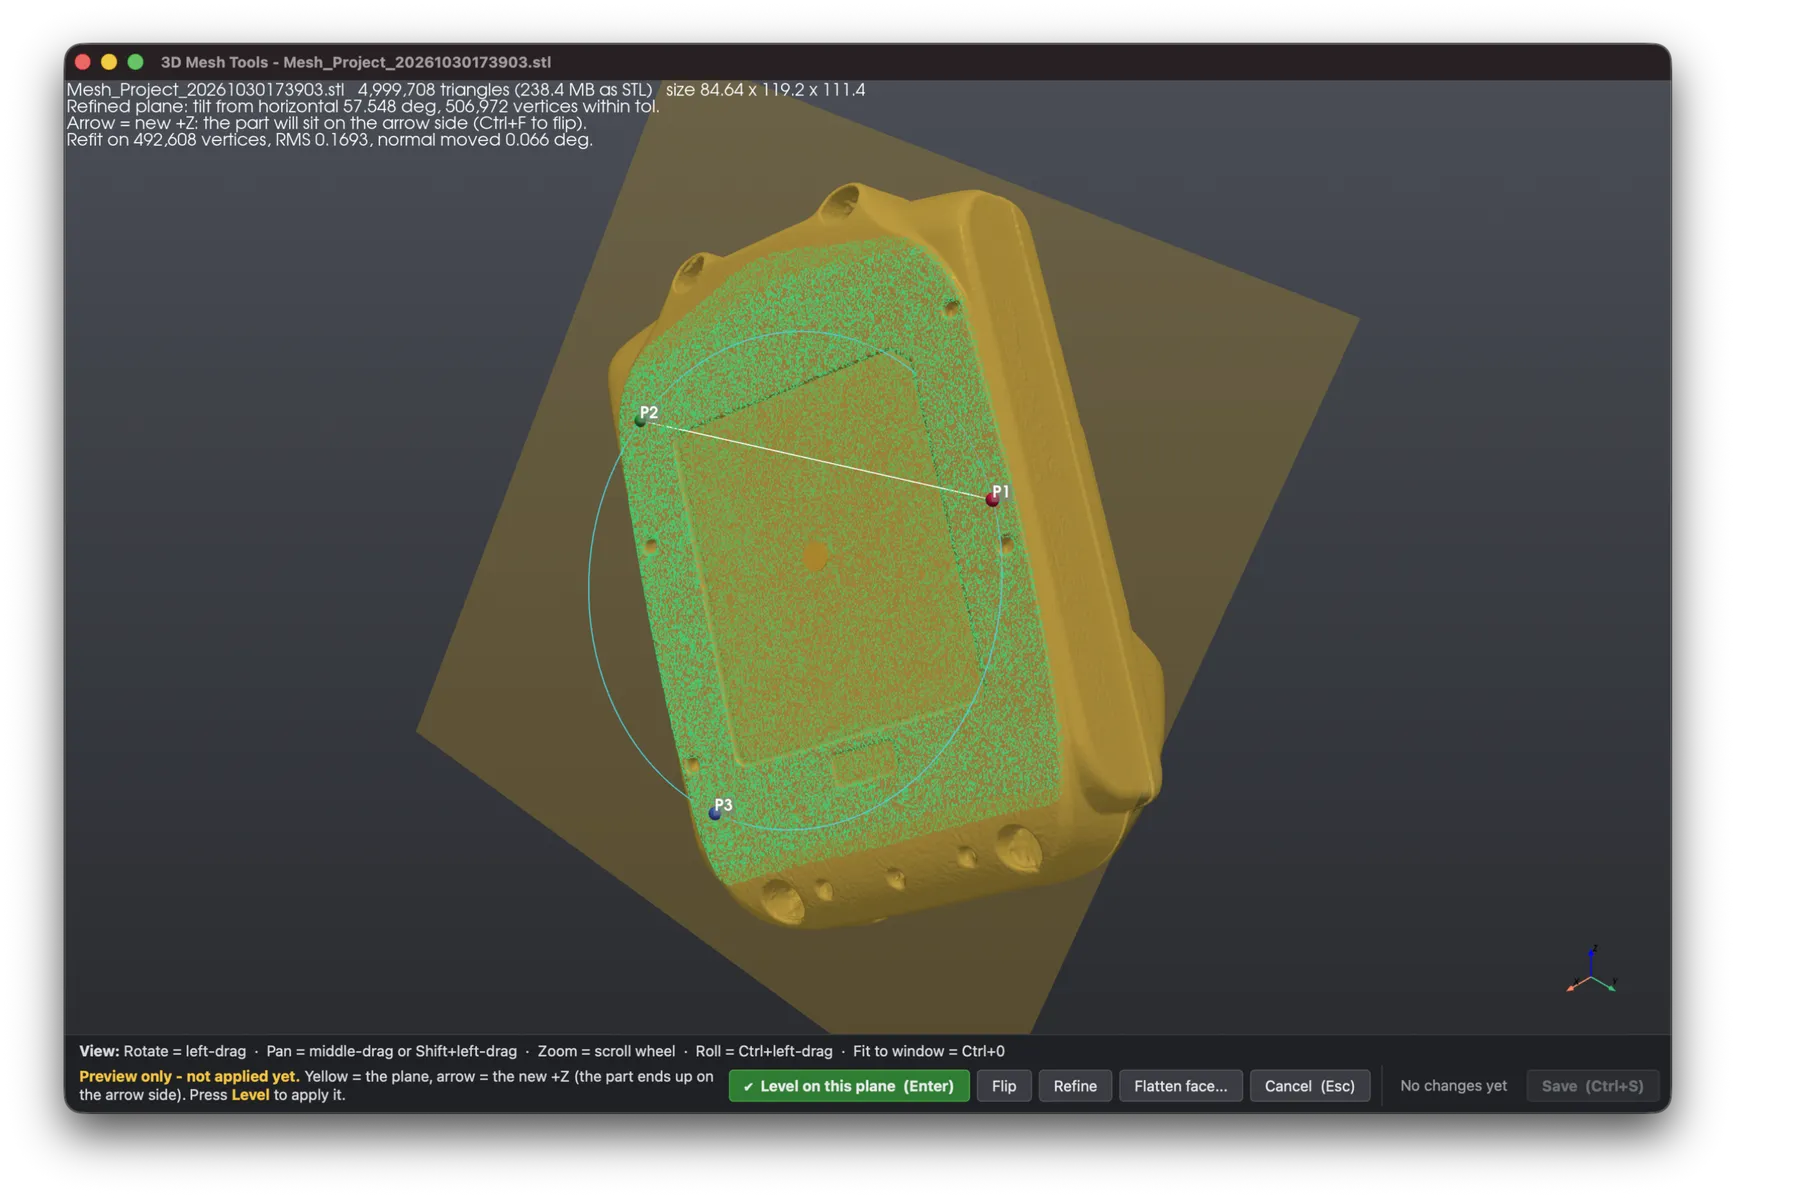
- Level a part on any face. Pick three points on the face that should sit flat, or use Find plane to detect the largest flat area automatically (press it again to cycle to the next one). A preview shows the plane and which way is "up" before anything changes.
- Refine the fit. Three hand-picked points on a noisy scan can be a fraction of a degree off. Refine fits the plane to every vertex on that face using least squares, so the result is as flat as the scan allows.
- Flatten a rough face. Scanners often leave a nominally flat face with a fine ripple. Flatten face snaps that face exactly onto the fitted plane, easing smoothly into its edges so there are no steps, and leaves the rest of the part untouched.
- Square it to X or Y. Pick two points along a straight edge, or define a plane on a side face, and rotate the part about Z so that edge runs along X or Y. The level you set is kept.
- Set the origin. Centre the part's bounding box on 0,0 (keeping its base on Z = 0), centre it in all three axes, put any picked point at the origin, or centre a hole on the origin by picking three points round its edge.
Measure and scale
- Measure. Every picked point shows its coordinates. Two points show the distance (and its X, Y and Z components); three show the angle between them and the diameter and centre of the circle through them — pick three points round a hole to measure it. Edit › Copy measurements copies the lot.
- Scale to a real dimension. Pick two points across a feature you know the size of, type the true measurement, and the whole mesh scales to match. One-click inch ↔ mm conversion is included for files exported in the wrong units.
Shrink
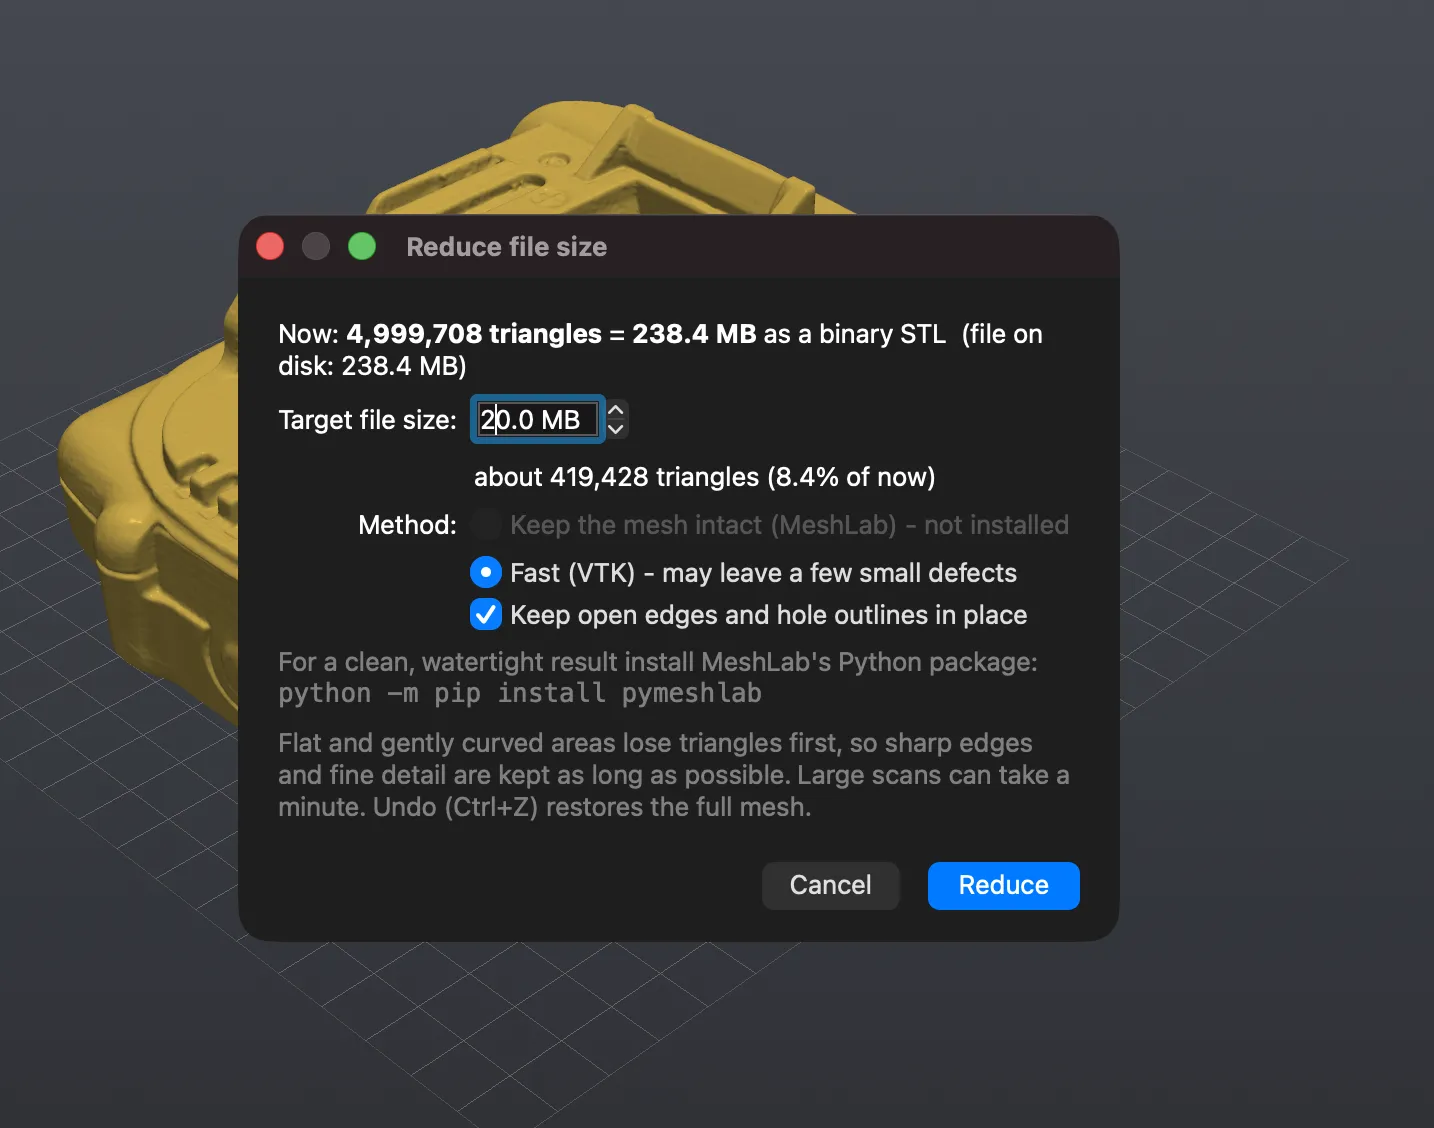
- Reduce the file size. Type the file size you want in MB and 3D Mesh Tools reduces the triangle count to match, simplifying flat and gently curved areas first so edges and fine detail are kept. With the optional MeshLab add-on (see below) the mesh stays intact — a watertight scan stays watertight. On a 119 MB scan reduced to 9 MB, the surface moved by thousandths of a millimetre on average.
- Deviation map. View › Deviation map colours the part by how far each point has moved from the original scan — red where material was added, blue where it was removed — so you can see exactly what flattening, repairs and reduction have changed.
And
- Drag and drop. Drop a file onto either window to open it (in 3D Mesh Compare, drop both files at once and pick which is the reference). File › Open recent lists the last ten.
- Undo anything. Every step can be undone, and nothing touches your original file. Undo snapshots of big scans are kept on disk rather than in memory.
- Re-use the transform. Alongside the aligned STL, 3D Mesh Tools saves the exact 4×4 transformation matrix it applied, so you can apply the identical move to another file — for example, align a lightweight copy interactively, then apply the same transform to the full-resolution scan.
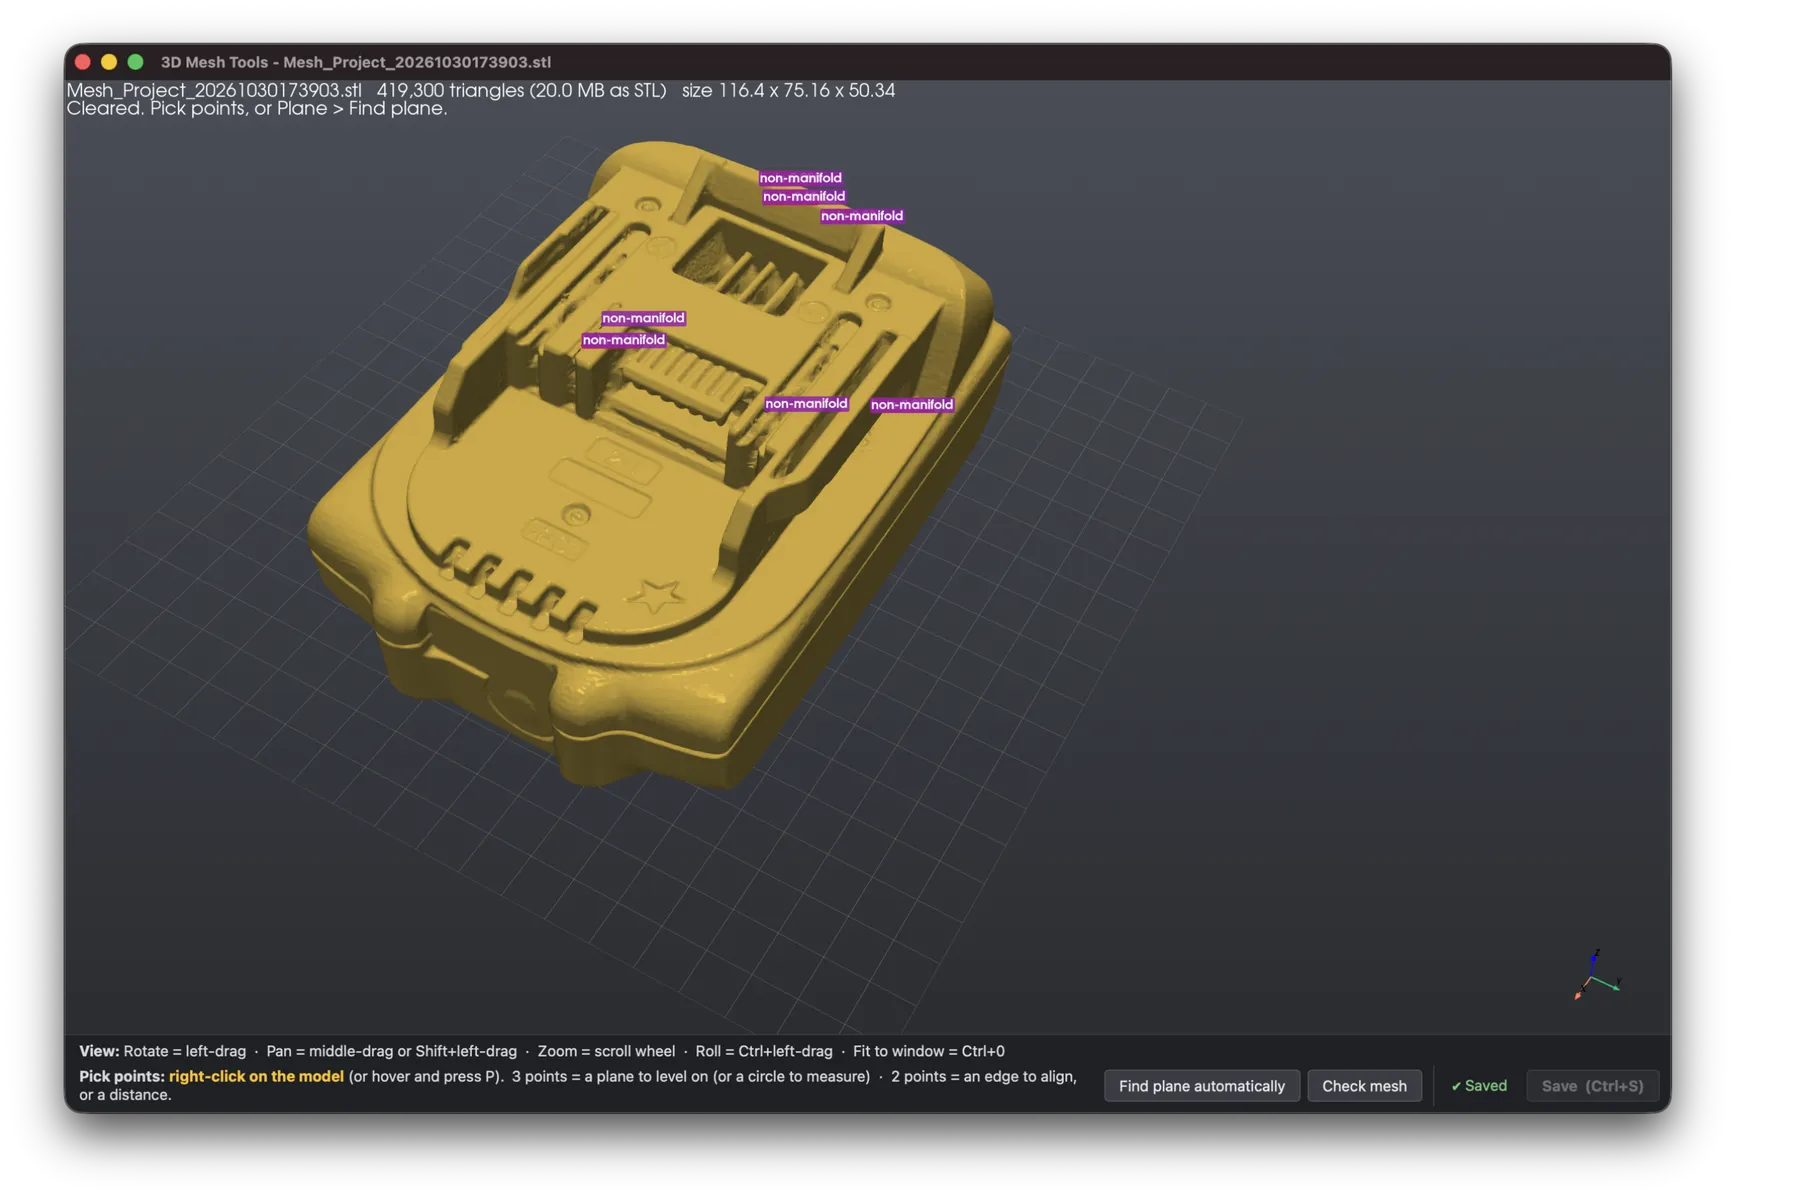
It opens STL, PLY and OBJ files and saves binary STL.
Installing
Install it first — installation guide. Both programs come in the same download.
Running it
In a terminal, change to the unzipped folder and run:
python 3dmeshtools.py
A file browser opens so you can choose a mesh. You can also open a file directly:
python 3dmeshtools.py "C:\Scans\bracket.stl"
On Windows you can usually just double-click 3dmeshtools.py as well.
A typical session
- Open your scan (File › Open, or Ctrl+O).
- Check it (optional). Mesh › Check mesh (Ctrl+I) lists any problems, with buttons to Remove small pieces and Fill holes.
- Level it. Right-click three points spread out across the face that should sit on the bed — or use Find plane automatically. A yellow plane appears with an arrow showing the new +Z; the part will end up on the arrow side. Use Refine for a more accurate fit, Flatten face… if the face is rough and should be perfectly flat, and Flip if the arrow is pointing the wrong way, then click the green Level on this plane button (or press Enter).
- Square it up. Right-click two points along a straight edge, then choose Align edge to X or Align edge to Y.
- Scale it (optional). Right-click two points across a known dimension, choose Scale to distance… and type the real value.
- Set the origin. Origin › Center of extents – XY centres the part on 0,0 with its base on Z = 0.
- Reduce the file size (optional). Mesh › Reduce file size… (Ctrl+D), type the size you want, and click Reduce. Very large scans can take a minute; Cancel stops it straight away.
- Check what changed (optional). View › Deviation map (Ctrl+Shift+D).
- Save (Ctrl+S). This writes
yourfile_aligned.stlandyourfile_aligned_matrix.txtnext to the original.
The strip along the bottom of the window always tells you what your picks can be used for, offers buttons for the next step, and shows whether you have unsaved changes. Help › Quick start (F1) walks through the same steps inside the program.
Controls
| Action | How |
|---|---|
| Rotate the view | Left-drag |
| Pan | Middle-drag, or Shift + left-drag |
| Zoom | Scroll wheel |
| Roll | Ctrl + left-drag |
| Fit model to window | Ctrl+0 |
| Pick a point | Right-click on the model, or hover and press P |
| Clear picks | Esc |
| Copy measurements | Ctrl+Shift+C |
| Check mesh | Ctrl+I |
| Apply a previewed plane | Enter |
| Flatten face onto plane | Ctrl+G |
| Reduce file size | Ctrl+D |
| Deviation map on/off | Ctrl+Shift+D |
| Undo | Ctrl+Z |
Every command is in the menus at the top of the window, with its keyboard shortcut alongside. Help › Mouse & keyboard controls lists them all. On a Mac, use Cmd in place of Ctrl; a two-finger click on a trackpad counts as a right-click.
You can change the model's display colour under View › Model colour….
Command-line use
3D Mesh Tools can also run without the window, which is handy for batch jobs. Run python 3dmeshtools.py --help for the full list.
Print a health report:
python 3dmeshtools.py scan.stl --info
Automatically level a part on its largest flat face and save it:
python 3dmeshtools.py part.stl --auto
Add --center xy to also centre it on the origin, --tol 0.2 to set how close (in model units) a point must be to count as on the plane, and -o output.stl to choose the output name.
Repair, flatten, level, centre and shrink a scan in one go:
python 3dmeshtools.py big_scan.stl --remove-pieces --fill-holes --auto --flatten --center xy --target-mb 9
--remove-pieces removes pieces smaller than 5% of the largest (give a different percentage after it if you like); --fill-holes fills holes up to 2% of the part size across (or give a size). --reducer meshlab or --reducer vtk chooses the reduction method; by default MeshLab is used when it's installed.
Apply a saved transform to another file:
python 3dmeshtools.py full_res_scan.stl --apply-matrix part_aligned_matrix.txt
The matrix file is plain text: a 4×4 row-major transform, so it can also be used in your own scripts or other software.
Troubleshooting
The window flashes open and closes immediately. Run it from a terminal instead of double-clicking, so you can read the error. In most cases a library is missing.
"No module named numpy" (or pyvista, pyvistaqt, qtpy).
The libraries were installed for a different copy of Python. Run the install command using the same python you use to start the program:
python -m pip install numpy scipy pyvista pyvistaqt pyside6
"Can't find the 'meshtools3d' folder".
3dmeshtools.py and 3dmeshcompare.py both need the meshtools3d folder from the zip next to them. Unzip the whole download rather than copying out just the one file.
On Linux: "Could not load the Qt platform plugin xcb".
Install the missing system library, e.g. on Ubuntu/Debian: sudo apt install libxcb-cursor0.
Picking doesn't seem to do anything. Make sure you're right-clicking directly on the model, not the background. The bottom strip updates after every successful pick.
Find plane picks the wrong face. Press it again — each press moves on to the next-largest flat area. For noisy scans, try raising the tolerance under Plane › Plane tolerance….
Flatten removed a small feature I wanted to keep. Anything shallower than the flatten depth (fine engraving, ejector-pin marks) is flattened along with the roughness. Undo and use a smaller depth. The deviation map shows exactly what was flattened.
After reducing, the mesh check shows holes or non-manifold edges.
That's the fast reduction method. Undo, install MeshLab's package (python -m pip install pymeshlab), restart 3D Mesh Tools and reduce again — it keeps the mesh intact.
The reduced file has lost detail I need. Undo (Ctrl+Z) and choose a larger target size. The message after each reduction tells you how far the surface moved, in model units, so you can judge the trade-off.
Fill holes made a bulge or a flat patch. Hole filling suits small holes. Big gaps in a scan are better rescanned than filled.
Download
Download the zip — contains both programs. See the installation guide, or browse the source on GitHub.